 Save
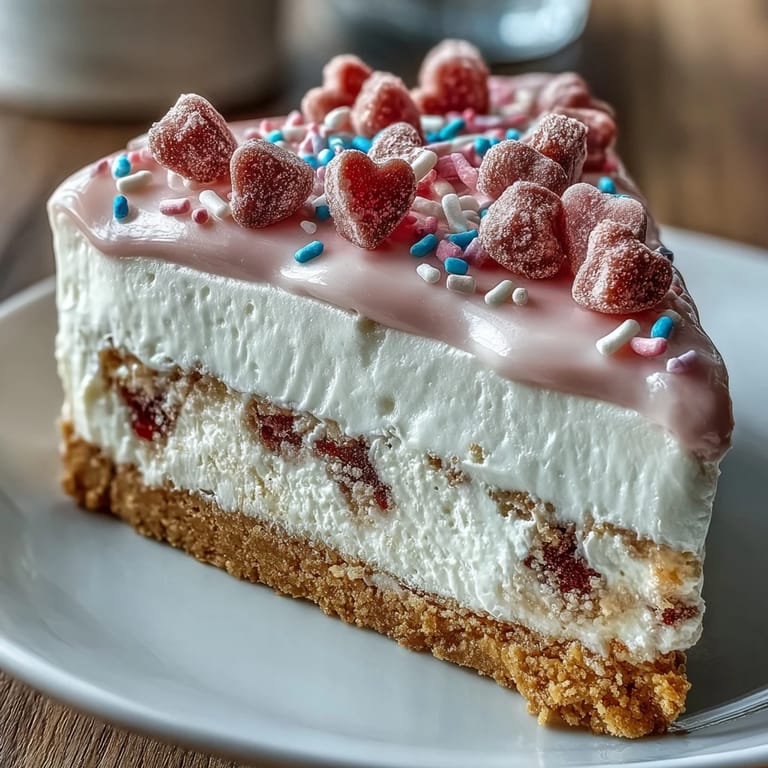
Save My neighbor handed me a bowl of conversation hearts one February morning, and I knew exactly what to do with them. I'd been dreaming about a dessert that looked like Valentine's Day exploded in the best way, something that didn't need an oven or a stand mixer running for hours. This fake cake became my answer: silky, swoony layers of no-bake cheesecake crowned with a pastel avalanche of candy hearts. It tastes like childhood valentines tucked into a grown-up dessert, and every time I make it, someone asks for the recipe before they've even finished their slice.
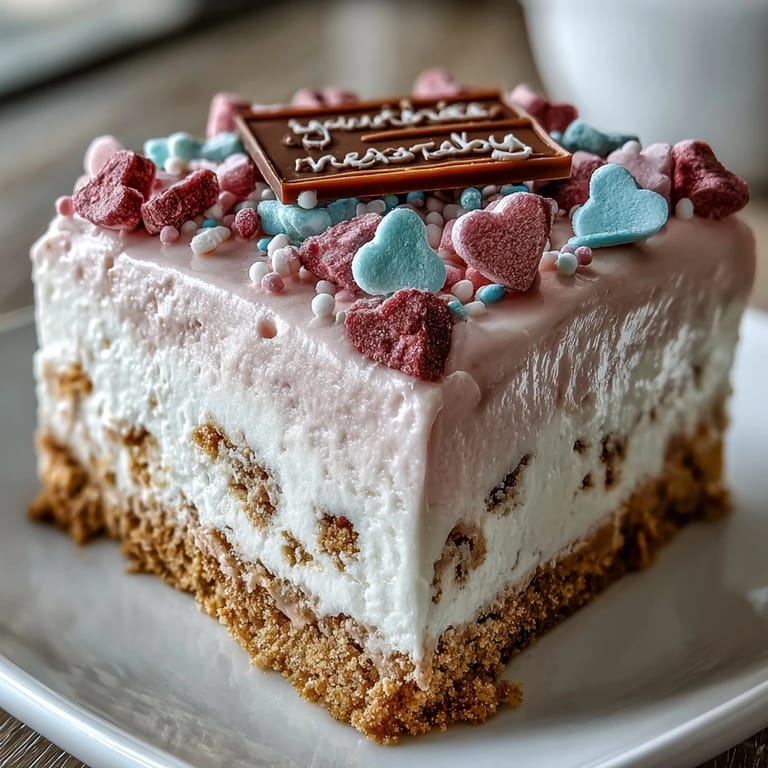
I brought this to a Galentine's brunch last year, and three friends tried to claim the leftovers. We ended up dividing the last two slices into bite-sized pieces so everyone could have one more taste. The pink frosting had gone slightly marbled because I got impatient with the food coloring, but no one cared. It sparked a full conversation about our favorite childhood candies, and someone admitted she used to sort conversation hearts by color before eating them. That cake became the centerpiece of the whole morning, not because it was fancy, but because it made us all feel like kids swapping valentines again.
Ingredients
- Graham cracker crumbs: The buttery, honeyed base that holds everything together; use store-bought crumbs or pulse whole crackers in a food processor until sandy.
- Unsalted butter: Melted butter binds the crust and adds richness; make sure it's fully cooled before mixing or it will make the crumbs greasy.
- Granulated sugar (for crust): Just enough sweetness to balance the graham flavor without competing with the creamy filling.
- Cream cheese: The soul of the filling; let it sit on the counter for at least an hour so it beats smooth without lumps.
- Powdered sugar: Dissolves instantly into the cream cheese and whipped cream, keeping the texture silky and preventing graininess.
- Pure vanilla extract: A warm, aromatic backbone that deepens the sweetness and ties all the layers together.
- Heavy whipping cream: Whipped to stiff peaks, it lightens the cream cheese and gives the frosting its billowy body.
- Pink gel food coloring: Optional but delightful; a tiny drop goes a long way, so add it slowly and swirl gently for soft marbling or mix fully for solid pastel.
- Conversation heart candies: The crunchy, chalky stars of the show; press them on gently so they stick without cracking the frosting.
- Rainbow sprinkles: A festive finishing touch that adds pops of color and a little extra sweetness in every bite.
Tired of Takeout? 🥡
Get 10 meals you can make faster than delivery arrives. Seriously.
One email. No spam. Unsubscribe anytime.
Instructions
- Build the Buttery Base:
- Stir graham crumbs, melted butter, and sugar until the mixture clumps like damp sand when you squeeze it. Press it firmly into your springform pan, using the bottom of a measuring cup to pack it down evenly, then chill for 15 minutes so it sets up nice and solid.
- Whip the Creamy Filling:
- Beat room-temperature cream cheese until it's completely smooth, then add powdered sugar and vanilla and beat until fluffy. In a separate chilled bowl, whip the cold heavy cream to stiff peaks, then gently fold it into the cream cheese mixture until no white streaks remain.
- Layer and Chill:
- Spread the airy cheesecake filling over the chilled crust, smoothing the top with an offset spatula. Cover the pan and refrigerate for at least 4 hours, or overnight if you want the firmest, cleanest slices.
- Frost with Pastel Clouds:
- Whip the remaining heavy cream with powdered sugar and vanilla to stiff peaks, then tint it pink with a few drops of gel coloring if you like. Release the chilled cake from the pan, transfer it to a serving plate, and spread the frosting evenly over the top and sides.
- Crown with Candy Hearts:
- Gently press conversation hearts into the frosted sides, covering them in an even layer, then scatter more hearts and rainbow sprinkles across the top. Chill for 30 minutes before slicing so the frosting and candy set perfectly.
 Save
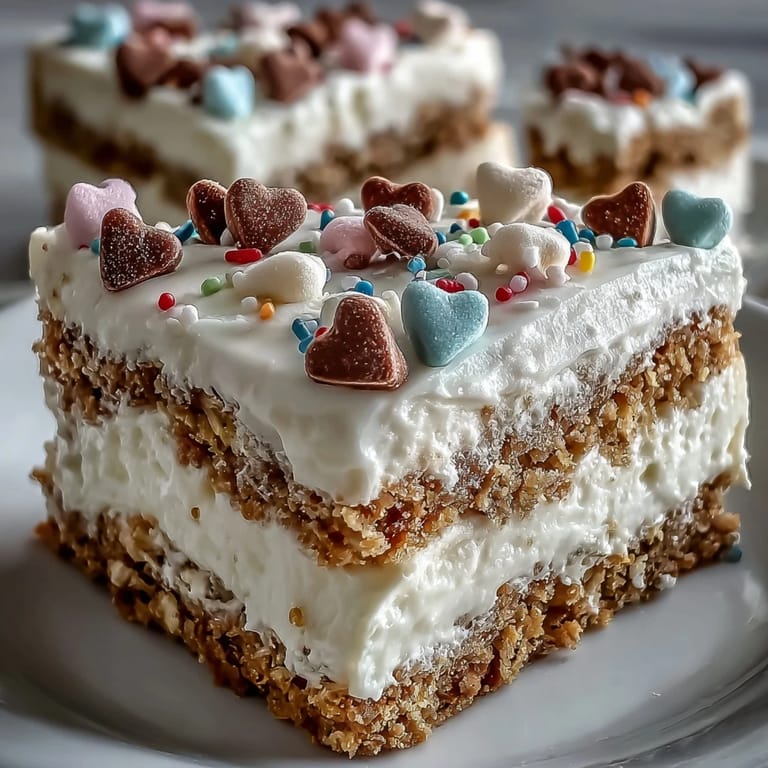
Save The first time I sliced into this cake, the layers stayed clean and perfect, and I felt like a baking show contestant who'd just nailed the final challenge. My daughter grabbed a heart off the top and read it out loud before popping it in her mouth. We laughed at the ridiculous little messages, and suddenly this dessert wasn't just pretty, it was a moment we shared. Every time I make it now, I think about those silly candy hearts and how something so simple can turn a regular Tuesday into a celebration.
Making It Ahead
This cake actually improves after a night in the fridge because the flavors meld and the filling firms up beautifully. You can make the whole thing a day or two in advance, but hold off on adding the candy hearts and sprinkles until a few hours before serving so they stay crunchy. If you need to freeze it, wrap the unfrosted cake tightly in plastic wrap and foil, then thaw it in the fridge overnight before frosting and decorating. I've done this for last-minute gatherings, and no one ever guesses it wasn't made that morning.
Customizing Your Fake Cake
Swap the graham crackers for vanilla wafers, chocolate cookies, or even gingersnaps if you want a spicier crust. You can leave the frosting white, tint it any pastel shade you like, or swirl in two colors for a marbled effect. Instead of conversation hearts, try crushed peppermint candies, chocolate hearts, or even fresh berries for a summery twist. I once made this with lemon zest in the filling and topped it with white chocolate hearts, and it tasted like a fancy lemon cloud.
Serving and Storing
Slice this cake with a sharp knife dipped in hot water and wiped clean between cuts for the neatest edges. Serve it chilled, straight from the fridge, and pair it with sparkling rosé, fruity herbal tea, or even a shot of espresso if you want to balance the sweetness. Leftovers keep in an airtight container in the fridge for up to four days, though the candy hearts may soften slightly after day two.
- Run your knife under hot water before each slice for clean, photo-worthy edges.
- If the frosting starts to weep, pop the whole cake back in the fridge for 20 minutes.
- Don't skip the 30-minute final chill; it's the difference between a cake that holds together and one that slides apart.
 Save
Save This fake cake is proof that the best desserts don't always need an oven or a culinary degree. Make it once, and it'll become your go-to for every celebration that deserves a little sweetness and a lot of smiles.
Recipe FAQ
- → Can I make this ahead of time?
Absolutely! The assembled cheesecake can be refrigerated overnight before adding the final whipped frosting and candy decorations. For the best texture, add the conversation hearts within 4-6 hours of serving to prevent them from softening.
- → What can I substitute for graham crackers?
Vanilla wafers, digestive biscuits, or even Oreos with the cream removed work beautifully as crust alternatives. Each brings a slightly different flavor profile while maintaining that essential buttery crunch.
- → How do I get stiff peaks when whipping cream?
Chill your bowl and beaters in the freezer for 10 minutes first. Use cold heavy cream and whip on medium-high speed. Stop when the cream stands straight up when you lift the beaters—over-whipping can turn it grainy.
- → Can I freeze this dessert?
Yes! Freeze the cheesecake with the crust and filling for up to 2 weeks. Thaw overnight in the refrigerator, then add the fresh whipped frosting and candy hearts before serving. The texture remains remarkably creamy.
- → Why did my filling turn out lumpy?
This usually happens when cream cheese isn't fully softened. Let it sit at room temperature for at least 2 hours, and beat it solo until completely smooth before adding other ingredients. Room-temperature ingredients blend seamlessly.
- → How many slices does this yield?
The 8-inch springform pan produces 10-12 generous slices. For smaller portions, cut into 16 thinner pieces—perfect for dessert buffets or when serving alongside other sweet treats.